top of page
Step 1 - Set up a Record.
a. Download and install the LibreOffice using the Home Page link.
b. Open the LibreOfficeCalc spreadsheet and establish an initial record as in the image below...

Step 2 - Download and install the World Editor (WED) Developer package. Run it and it will look similar to the below image...
a. The first time you run the WED program, you will need to select you XP11 installation directory using the CHOOSE button. This will populate any installed libraries as shown above.
b. Open the opensceneryx library, and add object 3.0bj from the library to the map south of 4R9. Then, from your spreadsheet copy the lat/long coordinates to the corresponding entries for the object.
c. Do a FILE_SAVE and also EXPORT SCENERY PACK and you're done, congratulations! You now have a stricken vessel to search for.
Step 3 - Develop an XP11 FMS search plan.
a. Download and install the latest version of Plan-G Flight Planner.
b. For this example, we will use a simple Parallel Sweep search pattern, with an entry point to the NW of the last Known Position (LKP). To get the starting point, I usually just look at the WED map before closing it, picking a desired point with the cursor and making note of the lat/long coords displayed on the bottom portion of the map. Enter the coords of the of the starting point on the spreadsheet for future reference.
c. For this example, I'm using the freeware Plan-G flight planner, but there are other planners available that allow you to employ user defined waypoints.
d. There are detailed functional descriptions in a couple of links on the Home Page, but here, I will employ a rough, and somewhat imprecise method, just to give you the gist of how to go about setting up your search pattern on Plan-G.
e. There is a major real world USCG air training facility located at Mobile Regional (KMOB), and I usually start my SAR flights from there. I have severe asthma, and no longer use VATSIM, so I won't make references to any ATC functions -- but anyone can employ VATSIM or other ATC service in conjunction with SAR missions.
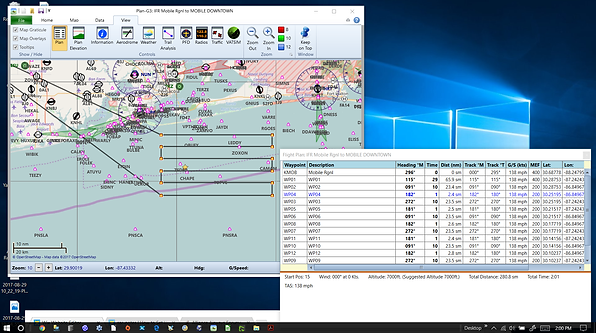
f. So, open up Plan -G and do a QUICK plan setup with your departure and arrival ICAO's. I usually depart from KMOB and after a successful search, proceed to KBFM (Mobile), where patient(s) can be offloaded and transported to the hospital. An image is provided below, which portrays this portion of the planning. Important aspects are highlighted in red. You can view the details of your plan by clicking on the VIEW tab, and selecting the PLAN PANEL icon.
g. Next, place a marker on the Plan-G map to portray the Last Known Position (LKP). The next image shows this.
h. Now, the mission developer is in a position to identify the starting point of entry into the search pattern. We know that the LKP is in or near the Gulf Stream, which flows eastward in this area, so a reasonable search area might be similar to the one in the image, below.
i. The general pattern for a Parallel Sweep search pattern is depicted inthe image below (Source: CAP-ES Mission Aircrew Course Chapter 11 Visual Search Patterns and Procedures, slide 12, May 2006)
j. Applying the above concept to our Plan-G search route, we can "rough-in" some user-defined waypoints to cover the search area. To create a user waypoints, just RIGHT CLICK on the map and select CREATE USER WAYPOINT on the popup menu.
k. Then, we edit the user waypoints for symmetry. Once added to the plan, thewaypoints can be dragged into a better rough symmetry. However, I normally just align all waypoints longitudinally to the starting (upper left and upper right) waypoints, by simply copying the coord data down and across the lines (in the Edit WAYPOINT dialog boxes. The result will be a symmetrical search pattern, as shown below.
l. Next, the waypoints need to be added to the route plan as shown below. Just right click on a waypoint to bring up a menu that will list your options.
Conratulations! You now have now completed Step 3, and have a complete parallel track search pattern. This is compatible with XP10. To achieve compatibility with XP11, the FMS file requires a couple of modifications.
Step 4 - Export and Modify FMS File.
a. Export the finisihed flight plan as shown in the image, below.
b. Locate and load the FMS file you exported into Notepad, the file content will appear as shown below.
c. To convert this file to XP11 format make the changes indicated below, highlight in yellow.
d. In XP11, both lines three and four must be an integer that reflects the number of route line entries, in this case 14. The altitude values should now have a decimal and six zero's after each value. I changed the altitude value to 1000,000000 for a fixed wing search. Helicopter should be 800.
e. Save the file and you are done with the FMS file conversion. You are now in a position to fly your search plan in XP11.


bottom of page